Today we are sharing three tutorials to adjust the bust of your Hoya blouse!
The lovely faux-wrap neckline of the Hoya blouse is its focal point, so it’s important to have it fit right! If you notice some fit issues on your muslin, here’s how to get rid of them.
Full Bust Adjustment (FBA)
Does your muslin fit at the shoulders, but is too constrictive at the bust? Are the panels pulled to the sides and gaping? Then you probably need a full bust adjustment.
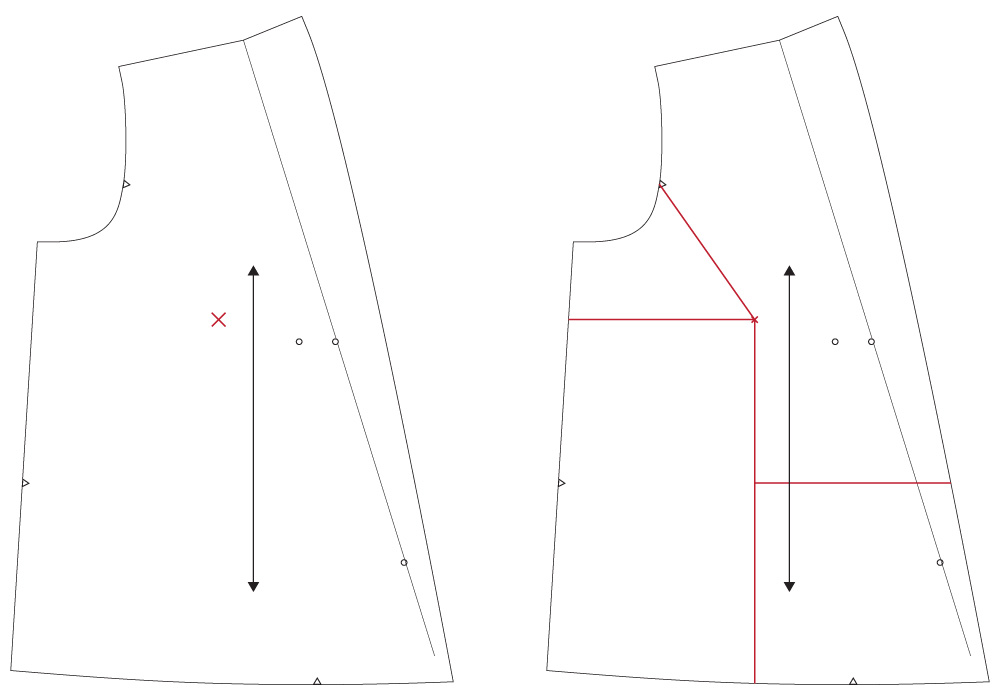
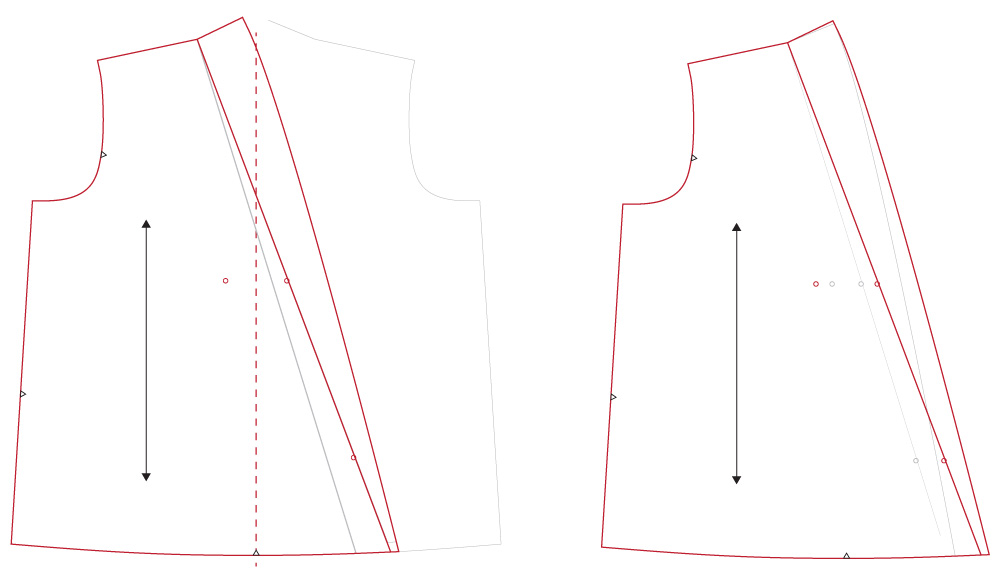
1/ First of all, mark your bust apex on your pattern piece (#1).
2/ Draw a vertical line (parallel to the straight-grain arrow) joining this point to the bottom of the piece, an horizontal line (perpendicular to the straight-grain arrow) joining this point to the left of the piece, and a third line joining this point to the armhole notch. Finally, draw an horizontal line at the level of the waist notch, as indicated on the illustration above.

3/ Slash along the vertical line and the armhole line, leaving a pivot point at the armhole. Pivot the left part to get the desired enlargment at the bust apex.
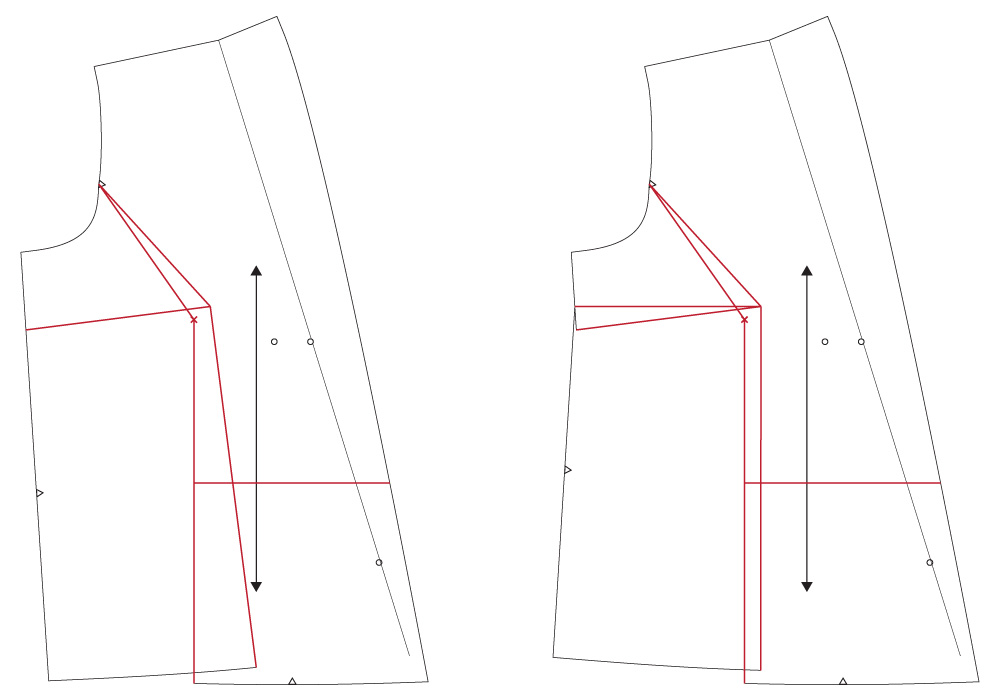
4/ Slash along the horizontal bust line. Pivot the lower left part so that its right edge becomes parallel to the straight-grain arrow again.

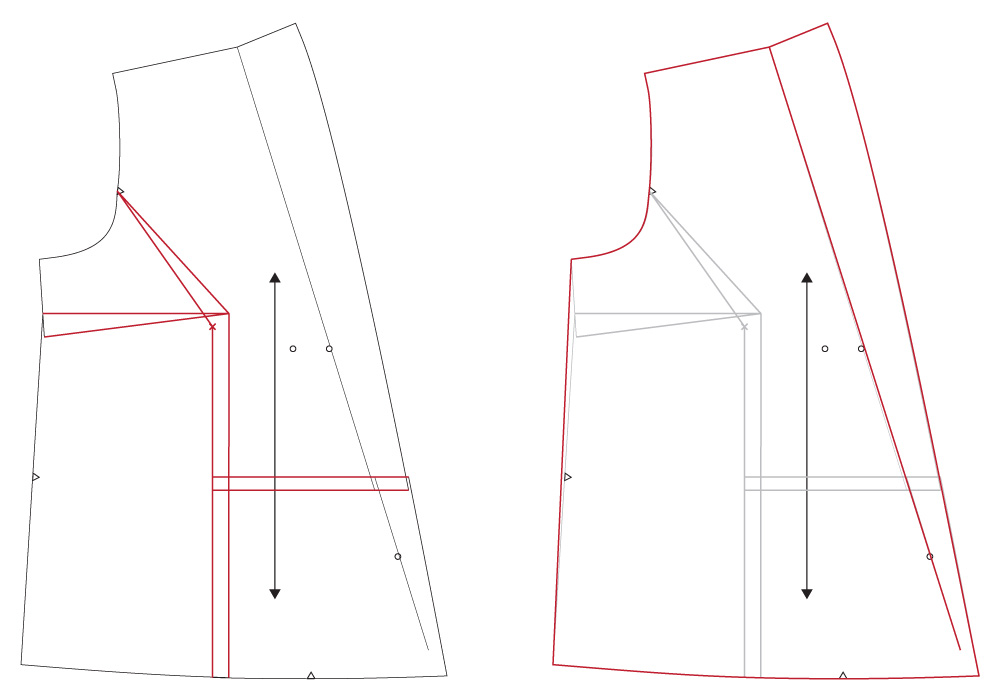
5/ Finally, slash along the waist line, and shift the lower right part down so that it is aligned to the lower left part of the piece.
6/ Take a new sheet of paper pattern and trace your new front piece. Don’t forget to mark the bust dart that was created on step 4, and to redraft the facing to match the new hemline.
Small Bust Adjustment (SBA)
In theory there shouldn’t be a need to do a small bust adjustment on Hoya (to adjust the neckline depth, jump to the next section!). However, if you feel like there’s a lot of extra ease at the bust even though the shoulders fit right, here’s how to do this adjustment.
1/ First of all, mark your bust apex on your pattern piece (#1).
2/ Draw a vertical line (parallel to the straight-grain arrow) joining this point to the bottom of the piece, an horizontal line (perpendicular to the straight-grain arrow) joining this point to the left of the piece, and a third line joining this point to the armhole notch. Finally, draw an horizontal line at the level of the waist notch, as indicated on the illustration above.
3/ Slash along the vertical line and the armhole line, leaving a pivot point at the armhole. Pivot the left part to remove the desired amount at the bust apex.
4/ Slash along the horizontal bust line. Pivot the lower left part so that its right edge becomes parallel to the straight-grain arrow again.
5/ Finally, slash along the waist line, and shift the lower right part up so that it is aligned to the lower left part of the piece.
6/ Take a new sheet of paper pattern and trace your new front piece. Be careful, as the length of the front had been reduced, so you’ll need to remove the same amount from the back piece. To do so, draw an horizontal line parallel to the lengthen/shorten line but above the waist notch. Cut along this line and shift the lower part of the back piece up so that the front and back sides are the same length. Finally, redraft the facing to match the new hemline.
Raising the neckline
Many of you have told us that you find the neckline of the Hoya blouse to be a little bit too plunging. Here’s how to modify the neckline’s depth easily without altering the wearing ease.
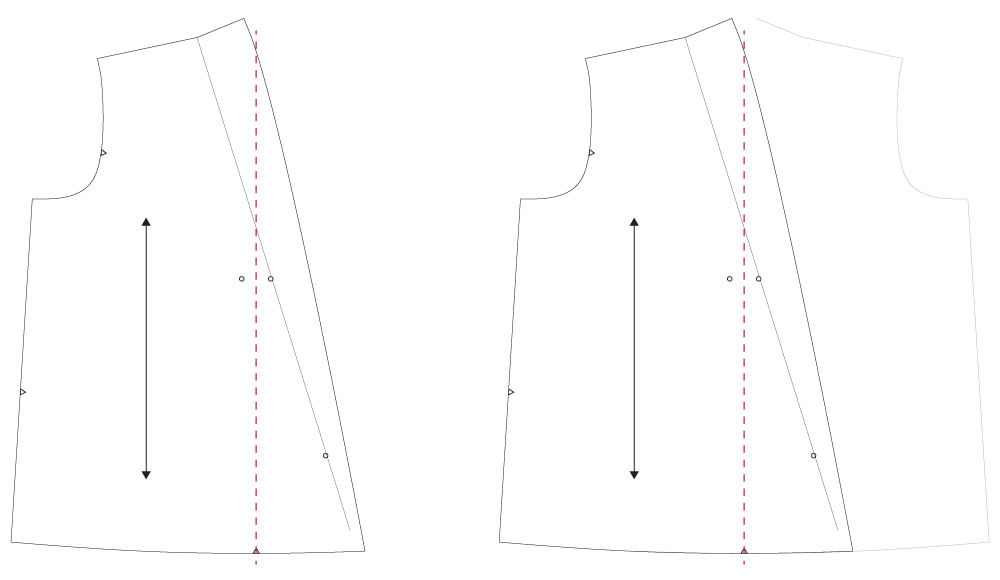
1/ Trace pattern piece #1, then draw a vertical line parallel to the straight grain arrow and going through the center front notch.
2/ Flip your pattern piece, place it underneath the pattern piece you’ve just traced, and align their center front notches, making sure that the grainline arrows are parallel. Tape in place.

3/ Draw a line extending the foldline, then slash the top layer along this line, leaving a pivot point at the shoulder.
4/ Pivot the right-hand-side part of the piece, until you get the desired neckline depth, mesured along the center line. Do not pivot the half-bodice that is on the bottom (the one that was flipped earlier).
5/ Extend the fold line and the edge of the piece to the bottom of the bodice. On a new sheet of paper pattern, trace your new front bodice. Move the right neckline dot to the right so that it is aligned with the new foldline, then move the left dot to the left of the same distance. Move the lower dot to the right so that it is aligned with the new foldline as well.
6/ Check you new pattern piece against the old one to control the neckline depth.
We hope these tutorials will be useful to help you make your dream Hoya blouse! Happy sewing 😉
5 commentaires
Pamela Davies, April 5 2017
Presumably the front facing needs to be adjusted too if a bust adjustment is done?
Eléonore, April 5 2017
There are no front facings, the front of the blouse is lined using the same pattern piece 🙂
Pamela Davies, April 7 2017
I was referring to the hem facing
Camille, April 10 2017
Ah yes, you’re absolutely right! We corrected the post to mention it explicitely 🙂


PsychicSewerKathleen, March 31 2017
Thank you for posting this tutorial. I’ve hesitated to purchase this pattern because the neckline is a little low for me and I always have to do an FBA on patterns (with the exception of patterns that are designed specifically for larger bust). Your pattern looked a little daunting to address these issues without some guidance!